

As an Amazon Associate, I earn from qualifying purchases
Setting up autosave in Blender is simple and essential. It helps prevent data loss during unexpected crashes.
Blender is a powerful 3D creation suite used by artists and designers worldwide. Losing hours of hard work due to an unexpected crash can be frustrating. Autosave is a feature that can save you from this nightmare. By enabling autosave, Blender will automatically save your work at regular intervals.
This can be a lifesaver, ensuring that your progress is not lost. In this guide, we will walk you through the steps to set up autosave in Blender, so you can work with peace of mind. Whether you are a beginner or a seasoned user, this feature is vital for safeguarding your projects.
Introduction To Autosave
Setting up autosave in Blender is essential for every user. Autosave can prevent data loss and save your progress automatically. This feature is especially useful when working on complex projects. In this section, we will discuss the importance of autosave and its benefits for beginners.
Importance Of Autosave
Autosave is a crucial feature in Blender. It ensures your work is never lost due to unexpected crashes. Let’s explore why autosave is important:
- Prevents Data Loss: Autosave automatically saves your work at regular intervals.
- Saves Time: You don’t have to remember to save your work manually.
- Reduces Stress: Knowing your work is safe can help you focus better.
Benefits For Beginners
For beginners, autosave offers several advantages:
- Peace of Mind: New users can work without worrying about losing their progress.
- Learning Curve: Beginners can focus on learning Blender without the distraction of manual saves.
- Improved Workflow: Autosave helps maintain a smooth workflow, especially during complex tasks.
Setting up autosave in Blender is easy. In the next sections, we will guide you through the process step-by-step.

Credit: www.youtube.com
Blender Installation
Setting up Blender is the first step to unlock its powerful features. This section will guide you through downloading and installing Blender. Follow these steps for a smooth installation process.
Downloading Blender
First, visit the official Blender website. You can find the latest version available for download. Click on the download button. Choose the right version for your operating system. Blender supports Windows, macOS, and Linux.
After choosing your OS, the download will start automatically. The file size is around 200 MB. Make sure you have enough space. A stable internet connection is essential for a smooth download.
Installing Blender
Once the download is complete, locate the file in your downloads folder. Double-click the installer file to begin installation. Follow the on-screen instructions carefully. You might need to agree to the license terms.
For Windows users, choose the installation directory. For macOS users, drag the Blender icon to the Applications folder. Linux users may need to follow additional steps. Refer to the Blender website for detailed instructions.
After installation, open Blender to ensure it is working correctly. You are now ready to explore Blender’s features. Setting up autosave is the next step.
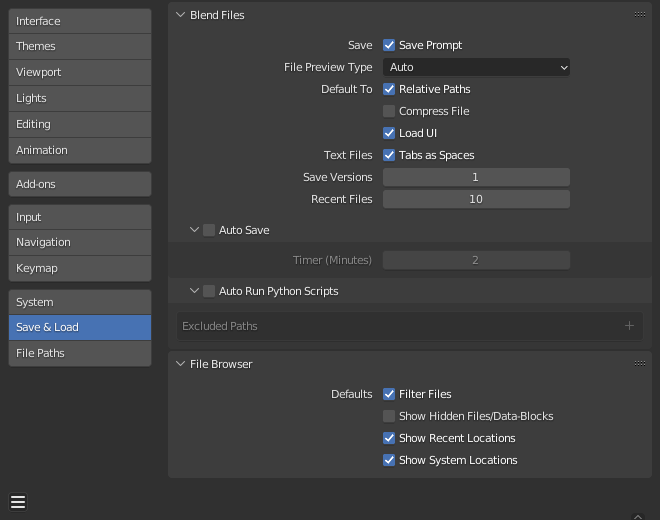
Accessing Autosave Settings
Setting up Autosave in Blender is crucial. It helps protect your work from unexpected crashes. In this section, we’ll explore how to access the Autosave settings. Follow these steps to ensure your projects are automatically saved. This will give you peace of mind while working.
Navigating Preferences
First, open Blender and go to the top menu. Click on Edit. A dropdown menu will appear. From there, select Preferences. This opens the Preferences window, which contains various settings. You can customize Blender according to your needs here.
Locating Save & Load
In the Preferences window, you will see a list of categories on the left-hand side. Scroll down until you find the Save & Load section. Click on it to access the settings related to saving and loading your work. Here, you will find the Autosave options.
| Option | Description |
|---|---|
| Save Versions | Number of backup files to keep |
| Autosave Interval | How often Blender autosaves your work (in minutes) |
Make sure to adjust these settings according to your preferences. Setting a shorter autosave interval means more frequent backups. Keeping more save versions can help recover older work if needed.
Once you have configured the settings, close the Preferences window. Your changes will be automatically saved. Now, you can work on your projects without worrying about losing progress. Blender will take care of saving your work at regular intervals.
Configuring Autosave
Configuring Autosave in Blender ensures that your work is always backed up. This feature saves your project at regular intervals, reducing the risk of data loss. Let’s dive into how you can set this up.
Setting Autosave Interval
First, open Blender and go to the “Edit” menu. Select “Preferences” from the dropdown. In the Preferences window, navigate to the “Save & Load” tab. Here, you’ll find the Autosave options. Set the autosave interval to your desired time. This defines how often Blender will save your project. A shorter interval means more frequent saves.
Customizing Save Locations
Next, you may want to customize the save location. This ensures your autosaved files are easy to find. In the same “Save & Load” tab, look for the “Temporary Files” section. Click on the folder icon to choose a new location. Select a directory that is convenient for you. Now, Blender will save your autosave files to this location.
Testing Autosave
To ensure the autosave feature works, you need to test it. Testing helps confirm that your work is safe in unexpected situations. Follow these steps to test autosave in Blender.
Creating A Test Project
First, open Blender and start a new project. Add some basic elements like a cube, sphere, or cylinder. Make changes to these objects. Move, rotate, or scale them. Save the project with a unique name.
Next, close Blender abruptly. You can do this by ending the task in your system’s task manager. This simulates an unexpected shutdown.
Verifying Autosave Function
Reopen Blender and look for the ‘Recover Auto Save’ option. This option is usually under the File menu. Click on it and select your test project from the list.
Check if all your changes are intact. If they are, the autosave feature is working. Repeat the process a few times to be sure.
Testing ensures your work is always safe. Now you can focus on your project with peace of mind.
Recovering Autosave Files
Blender’s autosave feature can be a lifesaver. It helps in recovering lost work during sudden crashes. Understanding how to locate and restore these autosave files can save hours of work. This guide will show you the steps to find and recover your autosave files.
Locating Autosave Files
Blender saves autosave files in a specific directory. To find it, first open Blender. Then, go to File, and select Recover. From there, choose Auto Save. A window will pop up showing a list of autosave files. These files are named with a blend1 or blend2 extension.
You can also find autosave files on your computer. They are usually stored in your system’s temp folder. On Windows, press Win+R, type %TEMP%, and hit enter. Look for files with a .blend extension. On macOS, the temp folder is located at /var/folders.
Restoring Projects
Once you locate your autosave file, restoring it is simple. Open Blender and go to File. Click on Open and navigate to the directory with your autosave file. Select the file and click Open Blender File. Your project should now load with the latest autosaved changes.
If the autosave file is not the latest version, check for other versions. Blender might save multiple versions of your project. Each file will have a timestamp. Choose the file with the most recent time.
Autosave is a powerful feature. Knowing how to locate and restore files ensures your work is never lost. Follow these steps to keep your projects safe.
Troubleshooting Autosave
Setting up autosave in Blender can sometimes come with its own set of challenges. Troubleshooting these issues ensures that your work is always saved and that you do not lose important progress. This section will guide you through common issues and provide solutions and fixes.
Common Issues
One common issue is autosave not triggering. This can happen due to incorrect settings. Another problem is Blender crashing before autosave occurs. This might result in lost work. Sometimes, autosave files get corrupted. This makes it impossible to recover your work.
Solutions And Fixes
Ensure that autosave is enabled in the settings. Go to Edit > Preferences > Save & Load. Check that the “Auto Save Temporary Files” option is turned on. Set the interval to a short time, like 2 minutes.
If Blender crashes, update to the latest version. Bug fixes in updates often solve crash issues. Save your work manually before starting heavy tasks. This reduces the risk of losing progress.
To handle corrupted autosave files, try opening them in a different Blender version. Sometimes, older versions can read corrupted files better. Backup your work regularly. Use external drives or cloud services for added security.
Credit: docs.blender.org
Additional Tips
Setting up autosave in Blender is a great way to ensure your work is always saved. But relying solely on autosave is not enough. Here are some additional tips to keep your work safe and organized.
Regular Manual Saves
While autosave is helpful, always perform regular manual saves. This gives you more control over your project. Use the shortcut Ctrl+S to save your work frequently. Create a habit of saving after every major change. This helps you keep a record of different stages of your project.
Consider using the Save As option to create different versions of your work. Name them clearly to avoid confusion. For example, project_v1.blend, project_v2.blend, and so on. This way, you can easily revert to a previous version if needed.
Using Version Control
Another effective method is using version control. Tools like Git can help you manage your project files. Version control allows you to track changes and collaborate with others easily. Here’s a simple way to get started:
- Install Git on your computer.
- Initialize a Git repository in your project folder.
- Commit your project files regularly with descriptive messages.
By using version control, you can easily manage different versions of your project. It also helps you collaborate with team members effectively.
| Action | Shortcut/Command |
|---|---|
| Manual Save | Ctrl+S |
| Save As | F2 |
| Initialize Git Repository | git init |
| Commit Files | git commit -m "message" |
By following these tips, you can ensure your Blender projects are always safe and organized.
Frequently Asked Questions
How Do I Enable Autosave In Blender?
To enable autosave in Blender, go to Edit > Preferences > Save & Load. Check “Auto Save Temporary Files” and set the interval.
Where Are Blender Autosave Files Stored?
Blender autosave files are stored in a temporary directory. On Windows, it’s usually in C:\Users\[Your Username]\AppData\Local\Temp.
How Often Does Blender Autosave?
Blender autosaves based on the interval you set. The default interval is every two minutes.
Can I Recover Unsaved Blender Files?
Yes, you can recover unsaved Blender files. Open Blender, go to File > Recover > Auto Save and select the file.
Conclusion
Setting up autosave in Blender is simple and essential. It prevents data loss. Follow the steps to enable autosave. This saves your work regularly. Autosave settings are customizable for your needs. Remember, saving your projects often is wise. Autosave gives peace of mind and protects your progress.
Now, you can focus on creating without worry. Happy blending!
As an Amazon Associate, I earn from qualifying purchases