

As an Amazon Associate, I earn from qualifying purchases
To pull a vacuum on a car AC system, it typically takes 15-30 minutes. The exact time can vary based on the system’s condition and the vacuum pump used.
Maintaining your car’s AC system is crucial for its efficiency and longevity. Pulling a vacuum removes moisture and air from the system, preventing potential damage. This process ensures that the refrigerant works effectively, keeping your car cool. Skipping this step can lead to costly repairs and poor performance.
Understanding how long to pull a vacuum on your car’s AC system can save you time and money. It helps in achieving optimal cooling and extends the life of the AC components. Let’s dive into the details to ensure your car’s AC system runs smoothly.
Importance Of Vacuuming
Introduction paragraph about How Long to Pull Vacuum on Car Ac System and Importance of Vacuuming. Keeping your car’s air conditioning (AC) system in top shape is essential for a comfortable ride. One crucial step in maintaining your AC is vacuuming the system. Pulling a vacuum on your car’s AC system ensures it runs efficiently and stays free from contaminants.
Benefits For Ac Efficiency
Vacuuming your car’s AC system offers numerous benefits. It enhances the overall efficiency of the system. Here are some key points:
- Improved Cooling Performance: Removing air and moisture allows the refrigerant to cool the air more effectively. This results in a cooler cabin.
- Longer Component Life: Moisture can cause corrosion and damage to AC parts. Vacuuming extends the life of these components.
- Energy Savings: An efficient AC system uses less power. This can lead to better fuel efficiency.
Additionally, vacuuming helps detect leaks. If the system cannot hold a vacuum, it indicates a leak. This early detection prevents future problems and costly repairs. Below is a table summarizing these benefits:
| Benefit | Description |
|---|---|
| Improved Cooling Performance | Better refrigerant flow and cooling |
| Longer Component Life | Prevents corrosion and damage |
| Energy Savings | Lower energy consumption |
| Leak Detection | Identifies leaks early |
Preventing Contaminants
Contaminants in the AC system can cause significant issues. Vacuuming helps eliminate these harmful substances. Here are the primary contaminants:
- Moisture: Moisture can freeze, causing blockages in the system. It also promotes corrosion.
- Air: Air reduces the system’s efficiency. It can also lead to the formation of acids.
- Debris: Small particles can clog filters and damage components.
Removing these contaminants ensures smooth operation. It also prevents unpleasant odors caused by mold and bacteria. The following table highlights the problems caused by these contaminants:
| Contaminant | Potential Issue |
|---|---|
| Moisture | Blockages and corrosion |
| Air | Reduced efficiency and acid formation |
| Debris | Clogged filters and damaged parts |
In summary, vacuuming your car’s AC system is vital. It enhances efficiency and prevents contaminants. This simple step ensures your AC system remains in optimal condition.

Credit: www.wikihow.com
Vacuum Pump Basics
Maintaining your car’s AC system is crucial for optimal performance. One important step is pulling a vacuum. This removes moisture and contaminants. A vacuum pump is used for this process. Understanding its basics helps ensure efficiency and effectiveness.
Types Of Vacuum Pumps
There are various types of vacuum pumps, each with unique features and benefits. Knowing these helps you choose the best one for your car AC system.
- Single-stage pumps: These pumps are simple and cost-effective. They are suitable for basic vacuum needs. They are ideal for small cars and regular maintenance.
- Two-stage pumps: These pumps provide deeper vacuum levels. They are more efficient and better for larger vehicles. They handle more complex AC systems.
- Rotary vane pumps: These pumps are durable and reliable. They offer consistent performance. They are suitable for both small and large vehicles.
- Diaphragm pumps: These pumps are oil-free. They are environmentally friendly. They are perfect for those who prefer a cleaner option.
Below is a table summarizing the key features of each type:
| Type | Features | Best For |
|---|---|---|
| Single-stage | Simple, cost-effective | Small cars, basic maintenance |
| Two-stage | Deeper vacuum, efficient | Larger vehicles, complex systems |
| Rotary vane | Durable, reliable | All vehicle sizes |
| Diaphragm | Oil-free, eco-friendly | Clean options |
Choosing The Right Pump
Selecting the right pump depends on several factors. Consider these points to make an informed decision:
- Vehicle Size: The size of your vehicle impacts the pump choice. Larger vehicles need more powerful pumps.
- AC System Complexity: Complex systems require efficient, high-performing pumps. Two-stage or rotary vane pumps are often best.
- Budget: Cost is always a factor. Single-stage pumps are cheaper but may not suffice for all needs. Balance cost with functionality.
- Environmental Concerns: If you prefer eco-friendly options, choose diaphragm pumps. They are oil-free and reduce environmental impact.
- Frequency of Use: Regular maintenance needs a durable pump. Rotary vane pumps offer longevity and reliability.
By considering these factors, you can ensure you choose the right vacuum pump. This ensures your car AC system runs smoothly and efficiently.
Steps To Vacuum An Ac System
Maintaining your car’s AC system is crucial for optimal performance. One of the essential steps is vacuuming the system. Understanding how long to pull a vacuum on your car AC system and the steps involved can help you ensure the system is free of air and moisture. Let’s dive into the detailed steps to vacuum an AC system.
Preparation And Setup
Before starting, gather all necessary tools. You will need a vacuum pump, manifold gauge set, and safety gloves.
Follow these steps for preparation and setup:
- Turn off the car: Ensure your car is off to avoid any accidents.
- Locate the AC service ports: Typically, these are found near the compressor. Look for the high and low-pressure ports.
- Check the manifold gauge set: Ensure all valves are closed before connecting it to the service ports.
- Wear safety gloves: Protect your hands from any chemicals or sharp objects.
Once you have prepared the tools and located the service ports, proceed to connect the manifold gauge set. This will help measure the pressure in the system.
Refer to the table below for a quick checklist:
| Task | Status |
|---|---|
| Turn off the car | Completed |
| Locate AC service ports | Completed |
| Check manifold gauge set | Completed |
| Wear safety gloves | Completed |
Connecting The Pump
With the preparation complete, the next step is connecting the vacuum pump. This step ensures the system is ready for vacuuming.
Follow these steps to connect the pump:
- Attach the manifold gauge set: Connect the red hose to the high-pressure port and the blue hose to the low-pressure port.
- Connect the yellow hose: Attach the yellow hose to the vacuum pump.
- Turn on the vacuum pump: Power up the pump and open the valves on the manifold gauge set.
- Monitor the gauges: Check the pressure readings on the gauges. They should drop as the vacuum pump removes air and moisture.
- Run the pump: Let the pump run for at least 30 minutes. This ensures thorough removal of contaminants.
During the process, keep an eye on the pressure readings. The goal is to achieve a deep vacuum, ideally below 500 microns.
Once the vacuum is pulled, close the valves and turn off the pump. Disconnect the hoses carefully, starting with the yellow hose from the vacuum pump.
Refer to the table below for a quick checklist:
| Task | Status |
|---|---|
| Attach manifold gauge set | Completed |
| Connect yellow hose | Completed |
| Turn on vacuum pump | Completed |
| Monitor gauges | Completed |
| Run pump for 30 minutes | Completed |
| Close valves and turn off pump | Completed |

Credit: www.youtube.com
Recommended Vacuum Duration
Pulling a vacuum on a car AC system is crucial for optimal performance. It removes air and moisture, ensuring the system operates efficiently. Understanding the recommended vacuum duration can make a big difference in your AC system’s longevity and effectiveness.
General Guidelines
The recommended vacuum duration for a car AC system generally ranges from 30 to 45 minutes. This ensures that all air and moisture are thoroughly removed. Here are some general guidelines to follow:
- Initial Vacuum: Start with an initial vacuum of 30 minutes. This is usually sufficient to remove most air and moisture.
- Extended Vacuum: If the system has been open for an extended period or has significant moisture, extend the vacuum time to 45 minutes.
- System Checks: After pulling a vacuum, check for leaks. A stable vacuum indicates no leaks.
Using a high-quality vacuum pump ensures the process is efficient. Investing in a reliable pump can save time and improve the system’s performance. Always refer to the vehicle’s manual for specific recommendations, as different models may have unique requirements.
| Condition | Recommended Duration |
|---|---|
| Normal Operation | 30 minutes |
| High Moisture | 45 minutes |
Factors Affecting Time
Several factors can affect the time needed to pull a vacuum on a car AC system. Understanding these can help you make informed decisions:
- System Size: Larger systems may require longer vacuum times. Ensure you account for the size of the AC system.
- Moisture Levels: High moisture levels need extended vacuum periods. Moisture can cause damage if not properly removed.
- Vacuum Pump Efficiency: A high-efficiency pump can reduce the required vacuum time. Invest in a quality pump for better results.
- Ambient Temperature: Higher temperatures can affect the vacuum process. Ensure the environment is suitable for pulling a vacuum.
Monitor the vacuum gauge throughout the process. A steady reading indicates the system is sealed and air-free. If the gauge fluctuates, extend the vacuum time and check for potential leaks.
Refer to your vehicle’s manual for specific recommendations. Different models may have unique requirements that affect vacuum duration. Following these guidelines helps ensure your car AC system operates efficiently and lasts longer.
Signs Of Incomplete Vacuum
Pulling a vacuum on your car’s AC system is crucial for optimal performance. This process removes air and moisture, ensuring the system works efficiently. But, how do you know if the vacuum is incomplete? Recognizing the signs can save you time and money. Here, we discuss the common symptoms and troubleshooting tips for an incomplete vacuum.
Common Symptoms
When the vacuum on your car’s AC system is incomplete, several symptoms may arise. Being aware of these signs can help you identify and rectify the issue promptly.
Here are some common symptoms:
- Weak cooling: The AC may not cool the car effectively. If the system cannot maintain a consistent temperature, it might indicate an incomplete vacuum.
- Strange noises: You may hear unusual sounds, such as hissing or bubbling. These noises suggest air is trapped in the system.
- Moisture buildup: If you notice moisture on the AC components or inside the car, it means the system has not been properly evacuated.
- Erratic performance: The AC may work intermittently, cooling effectively one moment and failing the next.
To help you further, here’s a table summarizing these symptoms:
| Symptom | Description |
|---|---|
| Weak Cooling | AC does not maintain a consistent temperature |
| Strange Noises | Hissing or bubbling sounds |
| Moisture Buildup | Visible moisture on AC components or inside the car |
| Erratic Performance | Intermittent cooling |
Troubleshooting Tips
If you suspect an incomplete vacuum, follow these troubleshooting tips to address the issue:
Check for leaks: Use a UV dye or a leak detection kit to identify any leaks in the AC system. Seal any found leaks and re-evacuate the system.
Re-vacuum the system: Ensure you pull a deep vacuum for at least 30 minutes. This helps remove any remaining air and moisture. Always use a reliable vacuum pump.
Inspect the vacuum pump: Make sure the vacuum pump is functioning correctly. A faulty pump may lead to an incomplete vacuum.
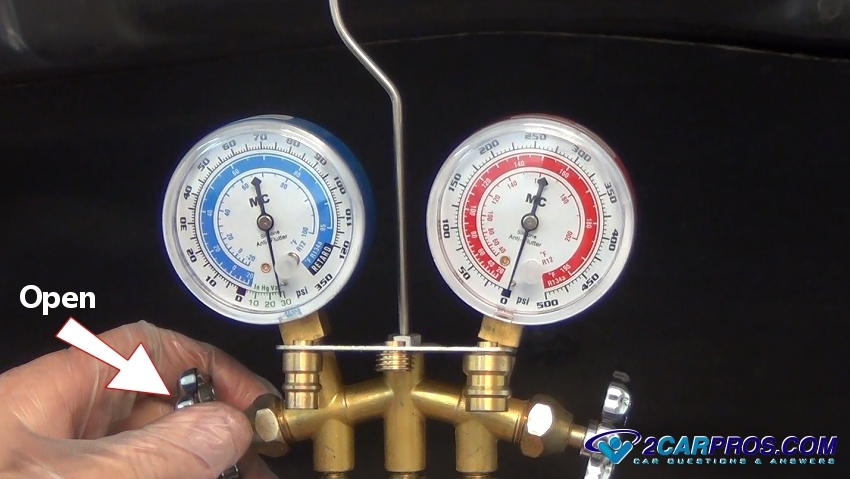
Monitor pressure gauges: Keep an eye on the pressure gauges. The low side should read close to zero, indicating a complete vacuum.
Replace the drier or accumulator: These components absorb moisture. If they are saturated, they need replacing to ensure proper system operation.
Here’s a quick checklist to help you troubleshoot effectively:
- Check for leaks
- Re-vacuum the system
- Inspect the vacuum pump
- Monitor pressure gauges
- Replace the drier or accumulator
Following these steps can help you achieve a complete vacuum, ensuring your car’s AC system performs optimally.
Safety Precautions
Pulling a vacuum on a car AC system is crucial for removing moisture and air, ensuring the system operates efficiently. Understanding and following safety precautions is essential for protecting yourself and your vehicle during this process.
Personal Safety Gear
When working on a car AC system, wearing the right personal safety gear is vital. It helps prevent injuries from refrigerants, sharp tools, and other hazards in the workspace.
Essential Personal Safety Gear:
- Safety glasses: Protect your eyes from debris and refrigerant splashes.
- Gloves: Use gloves to shield your hands from refrigerants and sharp objects.
- Long sleeves and pants: Wear long sleeves and pants to cover your skin and avoid frostbite from refrigerants.
- Closed-toe shoes: Protect your feet from heavy tools and falling objects.
Wearing this gear can prevent serious injuries. Always check your safety gear for damage before starting work.
Handling Refrigerants
Refrigerants are vital for the car AC system’s cooling process. Handling them with care is important to avoid health risks and environmental damage.
Guidelines for Handling Refrigerants:
- Work in a well-ventilated area: Avoid inhaling refrigerant fumes. They can cause dizziness, headaches, and other health issues.
- Avoid skin contact: Refrigerants can cause frostbite. Use gloves and other protective clothing.
- Use proper tools: Specialized tools are required for handling refrigerants. Ensure you have the correct gauges, hoses, and vacuum pumps.
- Follow disposal regulations: Dispose of used refrigerants according to local environmental regulations. Improper disposal can harm the environment.
- Check for leaks: Before and after vacuuming, inspect the system for leaks. Leaks can lead to refrigerant loss and system inefficiency.
By following these guidelines, you can handle refrigerants safely and maintain an efficient car AC system.
Post-vacuum Checklist
Properly maintaining your car’s air conditioning system is vital for a comfortable ride. One key step in this process is pulling a vacuum on the system, which helps remove moisture and air. After this process, a detailed post-vacuum checklist ensures your AC functions efficiently and lasts longer. Let’s dive into the important steps you should follow once the vacuum process is complete.
System Inspection
After pulling a vacuum on your car’s AC system, the first step is a thorough system inspection. This ensures everything is in good condition before recharging the system with refrigerant.
Begin by examining the AC components:
- Check for Leaks: Inspect hoses, connections, and fittings for any visible leaks.
- Inspect the Compressor: Ensure the compressor is not damaged and operates smoothly.
- Evaluate the Condenser and Evaporator: Look for any blockages or debris that could hinder performance.
Next, use a manifold gauge set to check the system’s vacuum:
| Component | Normal Reading |
|---|---|
| Low-side pressure | 20-30 psi |
| High-side pressure | 200-250 psi |
Ensure these readings are within the normal range. If they are not, there may be a leak or blockage that needs addressing. Additionally, inspect the AC belts for wear and tear. Replace any damaged or worn-out belts to avoid future issues. Finally, check the electrical connections to ensure they are secure and free from corrosion.
Recharging The Ac
Once the inspection is complete and everything looks good, it’s time to recharge the AC system. Recharging involves adding the correct amount of refrigerant to ensure optimal performance.
Follow these steps to recharge the AC:
- Attach the Refrigerant Can: Connect the refrigerant can to the low-side service port using the manifold gauge set.
- Open the Valve: Slowly open the valve on the refrigerant can to allow the refrigerant to enter the system.
- Monitor the Pressure: Keep an eye on the pressure gauges to ensure you don’t overfill the system.
- Check Temperature: Measure the temperature at the AC vents. It should drop to around 40°F-50°F.
It is important to use the correct type and amount of refrigerant specified for your vehicle. Overcharging or undercharging can lead to poor performance and damage the system. Use a refrigerant scale to measure the amount accurately.
Finally, run the AC system for several minutes to ensure it is cooling properly and there are no unusual noises or vibrations. Make any necessary adjustments to achieve the best performance. By following these steps, you can ensure your car’s AC system is properly recharged and ready to keep you cool.
Expert Tips
Maintaining your car’s AC system is vital to ensure it runs efficiently. One key step is pulling a vacuum. This process removes moisture and air from the system. But how long should you pull a vacuum on a car AC system? Let’s dive into some expert tips to help you get it right.
Professional Insights
Professionals recommend pulling a vacuum on your car’s AC system for at least 30 minutes. This time frame ensures that all moisture and air are removed. Here are some key points to keep in mind:
- Consistency: A consistent vacuum ensures no air or moisture remains.
- Gauge Reading: Monitor the gauge. It should stay steady at 29.92 inches of mercury (Hg) for at least 10 minutes.
- Temperature: Perform the vacuum process in a controlled environment. Extreme temperatures can affect the process.
Here’s a simple table for a quick reference:
| Step | Details |
|---|---|
| 1. Connect the vacuum pump | Attach to the low-pressure port. |
| 2. Start the vacuum pump | Run for at least 30 minutes. |
| 3. Monitor the gauge | Ensure it stays at 29.92 Hg. |
| 4. Close the valves | Check for steady gauge reading. |
Following these steps helps maintain your car’s AC system efficiency and longevity.
Common Mistakes To Avoid
While pulling a vacuum on your car’s AC system, avoid these common mistakes:
- Rushing the Process: Don’t cut the vacuum time short. Less than 30 minutes can leave moisture in the system.
- Ignoring Leaks: Check for leaks before you start. Leaks can make the vacuum process ineffective.
- Not Monitoring the Gauge: Always watch the gauge. A fluctuating reading can indicate issues.
Here are additional points to keep in mind:
- Skipping the Pump Oil Check: Ensure your vacuum pump oil is clean and at the correct level.
- Using Old Equipment: Old or faulty equipment can affect the vacuum quality. Use reliable tools.
- Overlooking the Environment: Perform the process in a clean, dry area. Dust and moisture can contaminate the system.
By avoiding these mistakes, you ensure your car’s AC system remains in top condition. Proper maintenance saves time and money in the long run.
How To Vacuum Down And Recharge Your A/c System!
Recharging your car’s A/C system requires careful steps to ensure it works efficiently. One of the crucial steps is pulling a vacuum on the system. This process removes air and moisture, which can damage the system. Let’s explore how long to vacuum an AC system and the details of this essential procedure.
How Long Should I Vacuum An Ac System?
Vacuuming your car’s A/C system is a critical step. It ensures the removal of unwanted air and moisture. The general rule is to vacuum the system for at least 30 minutes. This duration ensures that all contaminants are effectively removed.
Here are some key points:
- Minimum duration: 30 minutes
- Optimal duration: 45 minutes to 1 hour
- Longer vacuuming: Necessary if the system is highly contaminated
Vacuuming for the recommended time ensures that the system is free from air and moisture. This enhances the efficiency and longevity of your A/C system. Always use a reliable vacuum pump for this task.
How Long Should You Leave A Vacuum Pump On?
Leaving the vacuum pump on for the right amount of time is crucial. Experts suggest running the pump for at least 30 minutes. This ensures that all air and moisture are removed.
Consider the following:
- 30 minutes: Minimum recommended time
- 45 minutes to 1 hour: Ideal for optimal results
- More than 1 hour: Required for systems with high contamination
Running the pump for the appropriate time ensures your A/C system is clean and ready for recharging. It prevents potential damage and maintains the system’s efficiency. Always monitor the process to ensure it runs smoothly.
Why Is It Taking So Long To Pull A Vacuum On An Ac System?
Sometimes, pulling a vacuum on an A/C system takes longer than expected. Several factors can contribute to this delay:
- System leaks: Check for any leaks in the A/C system. Leaks can cause a delay in reaching the desired vacuum level.
- Old or inefficient vacuum pump: Ensure your vacuum pump is in good working condition. An old or inefficient pump may not perform well.
- High moisture levels: If there is excessive moisture in the system, it will take longer to remove it completely.
Addressing these issues can help speed up the vacuuming process. Regular maintenance and using a reliable vacuum pump are essential. Always check for leaks and repair them promptly.
How Long Should It Take For An Ac System To Equalize?
After vacuuming, the A/C system needs time to equalize. This process allows the pressure to stabilize. Typically, it should take around 15 to 30 minutes for the system to equalize.
Consider these points:
- 15 minutes: Minimum time for pressure stabilization
- 30 minutes: Optimal time for complete equalization
- More than 30 minutes: Indicates potential issues that need attention
Allowing the system to equalize ensures accurate pressure readings. This step is crucial before recharging the system. Monitoring the equalization process helps identify any issues early on.
Credit: www.2carpros.com
Frequently Asked Questions
How Long Should I Pull A Vacuum On A Car Ac System?
Pull a vacuum on a car AC system for 15 to 30 minutes. Ensure it reaches 29. 92 inHg for optimal results.
How Long Should You Run A Vacuum Pump On Ac?
Run a vacuum pump on AC for 15 to 30 minutes. Ensure the system reaches the desired vacuum level.
Why Is It Taking So Long To Pull A Vacuum On An Ac System?
A long vacuum pull on an AC system may indicate leaks, moisture, or contamination. Ensure connections are tight and equipment is efficient.
How Long Should It Take For An Ac System To Equalize?
An AC system typically takes 5 to 10 minutes to equalize. This depends on system size and conditions. Regular maintenance ensures optimal performance.
Conclusion
Proper vacuuming of your car’s AC system is crucial. It ensures efficiency and longevity. Typically, vacuuming for 30 minutes removes moisture and contaminants. This helps the AC function smoothly. Regular maintenance keeps your car comfortable. Follow the recommended guidelines for best results.
Happy driving with a cool breeze!
As an Amazon Associate, I earn from qualifying purchases