
As an Amazon Associate, I earn from qualifying purchases
Are you ready to unlock your creative potential and dive into the world of 3D modeling? Imagine crafting stunning animations, designing intricate models, or even creating your own short films—all from the comfort of your home.
“How to Use Blender” is your go-to guide for mastering this powerful, open-source software. Whether you’re a beginner or looking to refine your skills, this article will transform your learning experience. You’ll discover tips, tricks, and shortcuts that will make your projects stand out.
So, why wait? Dive in, and let’s turn your imagination into reality.
Credit: www.3dsecrets.com
Getting Started With Blender
Blender is a powerful tool for creating 3D graphics. It is free and open-source, making it popular for artists, designers, and hobbyists. Starting with Blender can be challenging, but with the right guidance, it becomes easier. This guide will help you get started with Blender, so you can begin creating your own 3D projects.
Understanding The Interface
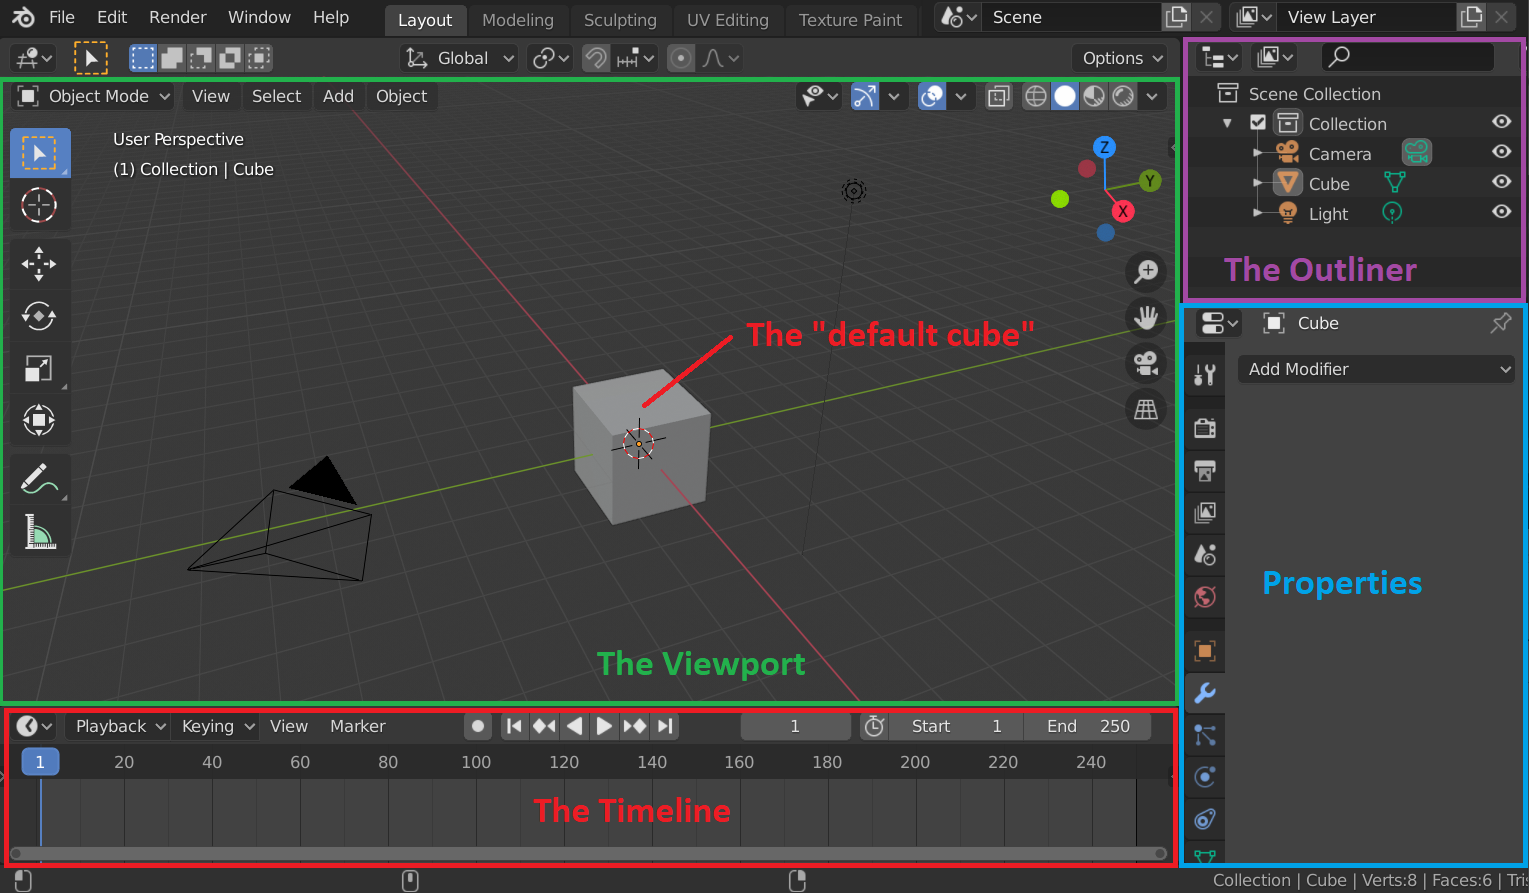
The Blender interface might seem complex at first. But don’t worry. It is organized to help you work efficiently.
- 3D Viewport:Where you create and edit your models.
- Outliner:Lists all objects in your scene. Helps in organizing them.
- Properties Panel:Adjust settings like materials and textures here.
- Timeline:Used for animations. It shows frames over time.
Basic Navigation
Learning how to move around in Blender is crucial. Here are some basic controls:
- Zoom:Use the scroll wheel on your mouse.
- Pan:Hold down the middle mouse button and drag.
- Rotate View:Hold the middle mouse button and move your mouse.
Creating Your First Object
Let’s start by adding a simple object. Follow these steps:
- Press
Shift + Ato open the Add menu. - Select Mesh, then choose Cube.
- Your cube will appear in the 3D Viewport.
Transforming Objects
Transformations are essential in modeling. You can move, rotate, and scale objects:
| Transformation | Shortcut |
|---|---|
| Move | G |
| Rotate | R |
| Scale | S |
Saving Your Project
Don’t forget to save your work. It is important to keep your progress safe.
- Go to Filein the top menu.
- Select Save As.
- Choose a location and name for your file.
- Click Save.
Credit: www.youtube.com
User Interface Basics
Blender is a powerful tool for creating 3D models, animations, and visual effects. Understanding its user interface is key to unlocking its potential. The user interface might seem complex initially, but with a little guidance, it becomes intuitive. The interface is designed to maximize efficiency, offering a wide array of features that cater to both beginners and professionals. Let’s dive into the basics of the Blender user interface and explore how it can enhance your creative projects.
Navigating The Layout
The Blender layout is structured to help you find tools quickly. The workspace is divided into several sections, each serving a distinct purpose. Here’s a brief overview:
- Header:Located at the top, it provides access to menus and the main toolbar.
- 3D Viewport:This is where you interact with your models and scenes.
- Properties Panel:Found on the right, it allows you to adjust settings for objects and scenes.
- Timeline:Situated at the bottom, it’s used for animation and playback.
To navigate efficiently:
- Use the middle mouse buttonto rotate the view.
- Scroll to zoom in and out.
- Press Shift + Middle Mouse Button to pan.
Understanding these basics will help you move around Blender with ease, allowing you to focus on your creative process without getting bogged down by technicalities.
Key Panels And Tools
Blender’s interface includes several panels and tools essential for creating and editing 3D models. Let’s highlight some of the most important ones:
- Toolbar:Contains tools for basic operations like move, rotate, and scale.
- Properties Panel:Divided into tabs such as Render, Scene, and World, enabling detailed control over your project.
- Outliner:Displays a hierarchical view of all objects in the scene, making it easy to manage complex projects.
- Shader Editor:Allows you to create and modify materials using nodes.
Here’s a simple table illustrating some key shortcuts:
| Function | Shortcut |
|---|---|
| Move Object | G |
| Rotate Object | R |
| Scale Object | S |
These panels and tools are designed to streamline your workflow. Mastering them will enhance your efficiency, allowing you to focus on creativity and innovation in your projects.
Creating Your First Project
Blender is a powerful tool for creating 3D models, animations, and much more. For beginners, starting a new project can be both exciting and daunting. This guide will walk you through the essential steps to begin your first project with Blender. From setting up a new file to creating basic objects, this journey will help you understand the basics and build a foundation for more complex projects.
Setting Up A New File
Before diving into creativity, setting up your new file is crucial. A well-structured file ensures a smooth workflow and organized project. Here’s how to get started:
- Open Blender and navigate to the top-left corner.
- Click on Fileand select Newfrom the dropdown menu.
- Choose the type of project: General, 2D Animation, Sculpting, or VFX.
Each project type offers different default settings. For beginners, the Generaloption is recommended. This option provides a blank canvas with basic tools for most projects.
After selecting your project type, configure the following settings:
| Setting | Description |
|---|---|
| Resolution | Set the desired resolution for rendering. |
| Frame Rate | Choose the frame rate for animations. |
| Units | Select metric or imperial units for measurements. |
These settings help tailor your project to your specific needs. Adjust them as necessary to fit your project’s requirements.
Basic Object Creation
With your file set up, it’s time to create basic objects. Objects are the building blocks of any 3D project in Blender. Follow these steps to start:
- Press Shift + Ato open the Add menu.
- Select an object type: Mesh, Curve, Text, etc.
- For beginners, start with a Mesh. Choose from options like Cube, Sphere, or Cylinder.
Once an object is added, you can manipulate its properties:
- Transform:Move, rotate, or scale the object using the transformation tools.
- Edit Mode:Enter Edit Mode by pressing Tabto modify vertices, edges, and faces.
- Modifiers:Apply modifiers to alter the object’s shape without changing its geometry.
Experiment with these tools to understand how each affects your object. Practice by creating simple scenes using different objects and transformations.
These basic skills form the foundation of 3D modeling in Blender. As you grow more comfortable, your projects will become more intricate and detailed.
Modeling Techniques
Blender is a powerful tool for 3D modeling, animation, and more. Modeling techniques are at the heart of creating stunning 3D visuals. Understanding these techniques can turn your basic shapes into complex models. Whether you’re a beginner or looking to polish your skills, getting the hang of modeling techniques is essential. Let’s dive into some core concepts that will help you start and improve your Blender journey.
Mesh Editing Tools
Mesh editing tools are fundamental for shaping and modifying 3D objects. These tools allow you to manipulate vertices, edges, and faces to create detailed models. Below are some key mesh editing tools in Blender:
- Extrude:This tool helps in extending a face to add depth. Use it to create walls, limbs, or any protruding part of your model.
- Loop Cut:Adds new edges to your mesh. It’s great for adding detail or control over your shape.
- Bevel:Smoothens sharp edges by creating a rounder surface. Use this for more realistic edges.
- Knife Tool:Cuts through the mesh to create new vertices and edges. Perfect for intricate designs.
Here’s a simple table to summarize the shortcuts:
| Tool | Shortcut |
|---|---|
| Extrude | E |
| Loop Cut | Ctrl + R |
| Bevel | Ctrl + B |
| Knife Tool | K |
Mesh editing tools are your best friends for precise control. They make the difference between a blocky model and a detailed masterpiece.
Sculpting Basics
Sculpting transforms basic shapes into lifelike models. This technique is similar to working with clay. You push, pull, and smooth the surface to create the desired form. Sculpting in Blender provides flexibility and creativity.
Here are some essential sculpting tools:
- Grab:Moves parts of your mesh. It’s like pulling the surface to reshape it.
- Inflate:Bulks up areas of your model. Useful for muscles or rounded shapes.
- Smooth:Reduces roughness on the surface. Great for refining details.
- Crease:Creates sharp lines. Ideal for defining edges and folds.
Sculpting tools allow for organic modeling, which is less about precision and more about form. Here’s how sculpting tools make an impact:
- Start with a base mesh.
- Use the Grab tool to adjust major forms.
- Apply the Smooth tool for a clean finish.
- Add details with the Crease tool.
Sculpting offers a dynamic way to bring your models to life. With practice, you can achieve stunning results.
Texturing And Materials
Blender is a powerful tool for 3D creation, offering a vast array of features. One of its key components is texturing and materials. These elements bring your models to life, adding depth and realism. Texturing involves wrapping images around 3D objects. Materials define how surfaces interact with light. Together, they create stunning visual effects. Understanding these concepts is essential for crafting detailed and immersive projects in Blender.
Applying Textures
Textures are images that wrap around 3D models, providing surface detail. Applying them in Blender starts with UV mapping. This process involves unwrapping your model’s geometry onto a 2D plane. Think of it like peeling an orange and laying the skin flat. Here’s how you do it:
- Select your model in the 3D View.
- Switch to Edit Modeand select the faces you want to unwrap.
- Press Uand choose Unwrapfrom the menu.
After unwrapping, you’ll see the UV layout. This guides how your texture fits the model. You can adjust the layout in the UV Editor. Now, it’s time to apply the texture:
- Open the Shader Editor.
- Add an Image Texturenode.
- Load your texture image.
- Connect the node to the Base Colorinput of the material.
Textures add realism but require careful alignment. Experiment with different images and UV layouts for the best results.
Creating Materials
Materials define how your model interacts with light. This includes color, reflectivity, and transparency. Creating materials in Blender involves using the Principled BSDFshader. It’s versatile and easy to use. Here’s a step-by-step guide:
- Go to the Shader Editor.
- Ensure your object has a material assigned. If not, add a new material.
- Use the Principled BSDFnode as the base.
This node combines multiple properties:
| Property | Description |
|---|---|
| Base Color | Sets the main color of your material. |
| Metallic | Controls the metal-like appearance. |
| Roughness | Adjusts surface smoothness. |
| Specular | Defines the intensity of reflected light. |
| Transmission | Controls transparency effects. |
Experiment with these settings to achieve desired effects. Adjusting each property can dramatically change the appearance of your model. Materials are crucial for creating believable and compelling 3D scenes. They offer endless possibilities for creativity in Blender.

Credit: www.kitchenaid.ca
Lighting Your Scene
Creating stunning visuals in Blender requires more than just modeling and texturing. Lighting your sceneis a crucial step that brings your 3D creation to life. Proper lighting enhances realism, sets the mood, and highlights important elements. Understanding the different types of lights and techniques can transform your project from ordinary to extraordinary. Let’s dive into the essentials of lighting your scene in Blender.
Types Of Lights
Blender offers various light types to illuminate your scene effectively. Each has unique properties suitable for different scenarios. Here’s an overview:
- Point Light:Emits light in all directions from a single location. Ideal for small, localized lighting like bulbs.
- Sun Light:Simulates sunlight with parallel rays. Great for outdoor scenes needing consistent light.
- Spot Light:Projects a cone of light. Useful for focused lighting effects, such as stage lights.
- Area Light:Provides soft, diffuse lighting. Perfect for simulating light from large surfaces like windows.
- Environment Light:Uses a texture to light the scene. Creates realistic ambient lighting, often with HDR images.
Understanding these lights helps in selecting the right one for your scene. Consider the atmosphere you want to create and the elements you wish to emphasize.
| Light Type | Use Case |
|---|---|
| Point Light | Local light sources |
| Sun Light | Outdoor scenes |
| Spot Light | Focused effects |
| Area Light | Soft lighting |
| Environment Light | Ambient lighting |
Lighting Techniques
Once you choose your lights, applying effective lighting techniquesis key. Here are some tips:
- Three-Point Lighting:A classic technique using key, fill, and back lights. The key light is the main source, providing shape. Fill light reduces shadows, and back light adds depth.
- Ambient Lighting:Ensures no part of the scene is too dark. Helps in achieving a balanced look without sharp contrasts.
- Color Temperature:Adjusts the mood of your scene. Warm colors create a cozy atmosphere, while cool colors give a modern feel.
- Shadow Quality:Enhances realism. Soft shadows add subtlety, while hard shadows highlight details.
- Light Intensity:Controls brightness. Experiment to find the right balance for your scene’s mood.
Experimenting with these techniques will improve your lighting skills. Always aim for a natural look, even in creative projects. Good lighting makes your scene believable and engaging.
Animation Fundamentals
Blender is a powerful tool for creating stunning animations. Understanding the fundamentals of animation in Blender can open up endless possibilities. Whether you’re crafting a short film or a simple animated scene, grasping the basics is key. This guide will walk you through the essentials, starting with keyframing and animating objects. Let’s dive in and explore how you can bring your creations to life.
Keyframing Basics
Keyframing is the backbone of animation in Blender. It involves setting specific points in time where an object changes. These points are known as keyframes. By setting these, Blender can smoothly transition between them. Here are some key points to understand:
- Setting Keyframes:Select the object you wish to animate. Move to the frame where you want to set a keyframe. Press
Iand choose the property to keyframe, such as location or rotation. - Interpolation:Blender uses interpolation to fill in the frames between keyframes. You can adjust the interpolation type in the Graph Editor to change how the transition occurs.
- Editing Keyframes:Use the Dope Sheet to view and edit keyframes. It allows you to move, delete, or duplicate keyframes with ease.
Consider this table for quick shortcut keys:
| Action | Shortcut Key |
|---|---|
| Insert Keyframe | I |
| Delete Keyframe | Alt + I |
| Move Keyframe | G |
Understanding these basics is crucial. It lays the foundation for more complex animations. Start practicing by setting simple keyframes. As you grow confident, try experimenting with different interpolation settings.
Animating Objects
Animating objects in Blender involves more than just keyframes. It’s about creating a believable motion. Here’s how you can start:
- Select Your Object:Choose the object you want to animate. Ensure it’s visible in the 3D Viewport.
- Position the Object:Place your object in the starting position. Use the transform tools to move, rotate, or scale it.
- Set Initial Keyframe:Press
Ito set the first keyframe. Choose the properties you want to animate. - Advance the Timeline:Move forward on the timeline. Adjust your object to the new position or rotation.
- Set a New Keyframe:Press
Iagain to set another keyframe. Repeat this process as needed.
Pay attention to the flow of motion. Ensure your animation is smooth by adjusting the spacing of keyframes. Use the Graph Editor to fine-tune the motion curves.
Animating objects can be simple yet rewarding. Start with basic movements. As you become comfortable, explore more complex animations. Experiment with different paths and speeds to enhance your animation skills.
Rendering Your Work
Blender is a powerful tool for 3D modeling, animation, and rendering. Rendering your work is a crucial step in bringing your digital creations to life. It transforms your 3D models into stunning images or animations. Whether you’re crafting a simple scene or a complex animation, understanding the rendering process is key. This section will guide you through setting up your render settings and exporting your project efficiently.
Render Settings
Before you start rendering, configuring the right settings is essential. Render settings impact the quality and speed of your final output. Here’s how you can optimize them:
- Resolution:Set your desired output size. Common choices are 1920×1080 for HD or 3840×2160 for 4K.
- Samples:Increase samples for smoother images but be aware it might slow down the process.
- Render Engine:Choose between Eevee for fast previews or Cycles for high-quality outputs.
Use a table to decide which render engine suits your project:
| Feature | Eevee | Cycles |
|---|---|---|
| Speed | Fast | Moderate |
| Quality | Good | Excellent |
Experiment with light paths and volumetrics for more advanced settings. These can greatly enhance the realism of your scene. Always do a test render to ensure everything looks right before committing to a full render.
Exporting Your Project
Once your render is complete, it’s time to export your project. Exporting ensures your work can be viewed or shared easily.
Follow these steps for a smooth export:
- Go to the Rendermenu and select Render Animationor Render Image.
- Choose the file format. Options include PNG for images or MP4 for videos.
- Set the output folder to keep your files organized.
Consider these file formats for different needs:
- PNG:Best for high-quality images with transparency.
- JPEG:Good for smaller file sizes without transparency.
- MP4:Ideal for videos, balancing quality and size.
Ensure you check your compression settings to avoid unwanted artifacts. Double-check the output location before starting the export to save time later. Exporting is the final touch to showcase your work effectively.
Tips And Tricks
Blender is a powerful tool for creating 3D models and animations. Understanding its interface can be daunting for beginners. That’s why knowing some tips and tricks can ease the learning curve. These tips will help you navigate Blender more efficiently, avoiding common pitfalls and enhancing your workflow. Let’s dive into some essential keyboard shortcuts and learn about common mistakes to avoid.
Keyboard Shortcuts
Keyboard shortcuts in Blender are your best friends. They save time and streamline your workflow. Here are some crucial shortcuts to keep in mind:
- G: Grab/move objects. Use it to reposition items quickly.
- R: Rotate objects. Perfect for adjusting angles.
- S: Scale objects. Resize elements with ease.
- E: Extrude selected faces. Essential for modeling.
- Ctrl + Z: Undo previous action. A lifesaver in many scenarios.
Below is a table summarizing these shortcuts for quick reference:
| Shortcut | Action |
|---|---|
| G | Grab/Move |
| R | Rotate |
| S | Scale |
| E | Extrude |
| Ctrl + Z | Undo |
These shortcuts speed up your workflow significantly. Learning them will help you create and edit models more effectively.
Common Mistakes To Avoid
In Blender, beginners often make mistakes that can hinder progress. Avoiding these can enhance your experience:
- Ignoring keyboard shortcuts:This leads to inefficient workflows. Learn and use them regularly.
- Overlooking the importance of layers:Layers help organize your project. Use them to separate different elements.
- Not saving frequently:Blender can crash unexpectedly. Save your work often to prevent data loss.
- Skipping tutorials:Tutorials provide insights and tips. Watching them can improve your skills.
- Neglecting project organization:Poor organization leads to confusion. Maintain a clean and structured project.
These mistakes are common but avoidable. Take time to learn, practice, and adjust your habits. This will lead to a smoother experience in Blender.
How Do You Use Blender Step By Step?
Blender is a powerful tool for creating 3D models, animations, and even games. Whether you’re a beginner or have some experience, understanding the steps to use Blender can make your journey smoother. Here, we’ll break down the process step by step to make Blender more accessible to everyone. From setting up the software to creating your first 3D model, these steps are designed to guide you through the basics and help you understand how Blender works.
Can A Beginner Use Blender?
Absolutely, Blender is accessible for beginners. It might seem complex at first, but with patience and practice, anyone can learn. Here’s how you can start:
- Download and Install:Visit Blender’s official website to download the latest version. Follow the installation instructions.
- Explore the Interface:Familiarize yourself with the layout. Spend time understanding the toolbar, 3D view, and properties panel.
- Basic Tutorials:Engage with beginner-friendly tutorials. Websites like YouTube offer plenty of free content.
- Practice:Try creating simple shapes like cubes and spheres. Experiment with moving, rotating, and scaling objects.
Blender has a supportive community. Forums and social media groups are great places to ask questions and share experiences.
| Tip | Description |
|---|---|
| Patience | Learning Blender takes time. Don’t rush the process. |
| Short Sessions | Break your learning into short sessions to avoid burnout. |
How To Use Mm In Blender?
Using millimeters in Blender is essential for precision modeling. Here’s how to set it up:
- Open Blender:Start the program and create a new project.
- Access Scene Properties:Navigate to the right panel and click on the ‘Scene’ tab.
- Units Setup:Under ‘Units’, select ‘Metric’. This allows you to use millimeters.
- Scale Adjustment:Set ‘Scale’ to 0.001. This converts meters to millimeters.
Now, every object you create will be measured in millimeters. This setup is crucial for projects requiring exact dimensions, such as 3D printing.
Ensure your objects are accurately scaled. Use the ‘Transform’ tool to adjust size and position.
- Use Grids:Enable grid snapping for more precise placement.
- Check Dimensions:Regularly review object properties to confirm measurements.
Can I Learn Blender In 2 Days?
Learning Blender in 2 days is ambitious but possible for basic understanding. Here’s a plan:
Day 1:
- Install Blender and explore the interface.
- Watch introductory videos to grasp basic concepts.
- Practice creating and manipulating simple shapes.
Day 2:
- Learn about materials and textures. Apply them to your models.
- Experiment with lighting and camera setup.
- Try rendering a simple scene.
Two days will give you a fundamental understanding. To truly master Blender, continuous practice is key.
Focus on small projects. Each project enhances your skills and builds confidence.
Utilize Blender’s community. Engage with forums for tips and support.
Frequently Asked Questions
What Are The Basic Steps To Use Blender?
To use Blender, first, install the software on your computer. Open Blender, then familiarize yourself with the interface. Start by creating basic shapes and use tools to modify them. Save your progress regularly. Practice using different features to improve your skills.
How Can I Render A Scene In Blender?
To render a scene in Blender, set up your camera and lighting first. Go to the Render tab and adjust settings like resolution. Choose a render engine such as Cycles or Eevee. Press F12 or select “Render Image” to start rendering.
What Are Blender’s Essential Modeling Tools?
Blender offers essential modeling tools like Extrude, Bevel, and Loop Cut. Use Extrude to extend surfaces and create new geometry. Bevel adds rounded edges for a smoother look. Loop Cut helps in adding additional geometry for detailed modeling. Master these tools to enhance your models.
How Do I Animate Objects In Blender?
To animate objects in Blender, switch to the Animation workspace. Select the object you want to animate. Use the timeline to set keyframes for movement, rotation, or scale changes. Adjust keyframes to create smooth animations. Play back your animation to see the results.
Conclusion
Blender is a powerful tool for creativity. Start with basic features first. Practice often to become more comfortable. Explore tutorials for helpful guidance. Experiment with different projects and ideas. Don’t be afraid to try new things. Mistakes are part of learning and growth.
Share your creations with friends and community. Feedback can help you improve skills. Enjoy the creative journey with Blender. Remember, patience and practice lead to success. Keep creating and exploring new possibilities. The more you use Blender, the better you’ll become.
Happy blending!
As an Amazon Associate, I earn from qualifying purchases